Tuesday, August 9, 2011

Mickey Cookie Brownie Cupcakes with Marshmallow Frosting

Okay, so I can't take credit for this recipe, but I love it so much that I found an excuse to make it "Mickey" so I could blog about it. I absolutely love the cupcakes, but the chocolate marshmallow frosting is the best! Definitely a must-try, Mickey-style or not!

The Recipe

The recipe for Cookie Brownie Cupcakes with Marshmallow Frosting can be found here (clicky). It is a recipe by talented (and hilarious) Cookbook Queen.  I definitely recommend subscribing to her blog, there are so many great recipes!

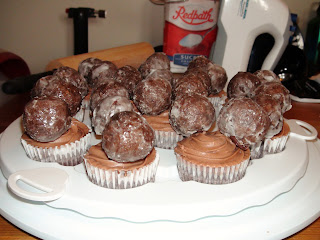
To make these delicious cupcakes "Mickey Style", just take 2 chocolate wafers (or any other circular treat) and make the ears! I used Wiltons Mint Chocolate Candy Melts.

The Review

As I mentioned, I already knew I'd love the cupcakes.  The recipe is delicious and the icing is addictive.  I could make a batch of this icing and just eat it (well, I could do that with any icing, but this icing is the best).  Here's the picture!


I think the ears look cute.  Not totally Mickey, but it still makes me smile!  I hope you enjoy (and definitely check out Confessions of a Cookbook Queen)


Saturday, August 6, 2011

Chocolate-Mint Mickey Cupcakes

Sorry this blog post has taken so long to get together, but it's been a busy few weeks!  I'm still on the hunt for a job, but I've kept busy with friends, family, and wedding photos!

So, on July 23rd a couple of old Disney CM's from Epcot decided to get back together for a Disney Games Night!  Due to the special occaision, I knew I had to make something delicious!  I'd read a recipe for Fudge Brownie Cupcakes with White Chocolate Frosting on Confessions of a Cookbook Queen, and so I decided to modify it to make Chocolate-Mint Mickey Cupcakes!

See, the cupcake is a Hidden Mickey!

The Ingredients

Yep, baking in Mickey PJs! 
  • Box of brownie mix, plus ingredients to make them according to the box
  • One extra egg
  • 1 bag of Wiltons Mint Chocolate Melts
  • 1 stick salted butter, at room temperature
  • 2 cups powdered sugar
  • 1/4 cup heavy whipping cream
  • Candy Sticks
  • 20-30 Chocolate Timbits (donut holes)

The Instructions

    The Brownie Cupcakes
  1. Preheat oven to 350 and line muffin cups with cupcake liners.
  2. Make brownie mix according to the box and add an extra egg.
  3. Fill prepared muffin cups 1/3 full. You should get about 15-18 brownies.
  4. Push one mint chocolate melt into each cupcake until it is level with the batter.
  5. Bake 20 minutes or so, until brownies bounce back when lightly touched.
  6. Remove from oven and allow to cool on a wire rack. While cooling, prepare the ears and frosting.
    The Frosting
  1. In a microwave safe bowl microwave pour in some of the Wilton melts and microwave according to the directions on the package.  Don't worry if you add too many, you'll use them for the ears.
  2. Let the chocolate cool.
  3. Add the butter and cream  to a bowl and beat on medium low speed with an electric mixer until smooth.
  4. Add powdered sugar and beat on medium until smooth.
  5. Add "some" melts and beat on medium-high until light and fluffy.  Use your judgement to determine the amount.  You can start with a little and add more until you like the flavour and consistency.  I ended up adding extra icing sugar as well.
    The Ears
  1. Cut enough candy sticks in half so that you have 2 per cupcake.
  2. Add more Wilton melts to the bowl and microwave according to the directions on the package.
  3. Dip one end of the candy stick into the Wilton melts, and insert it in a Timbit (see picture).
  4. Let all of the Timbits cool.
  5. If you'd like you can then dip the Timbits in the melts, which is more work but will give a more consistent look.  I was too lazy.

The Review

First, the picture:


These cupcakes were delicious!  The mint icing worked really well, and the Wilton melts added some strength to the icing so that it didn't melt in the heat (like a traditional buttercream).  If I wasn't in a rush and lazy, I definitely would have dipped the Timbits.  I think that would have looked better.

The only problem with the cupcakes was that the "ears" were heavy and would fall down after awhile.  You might not want to add them until they are ready to be served.

Hope you like them, I'm in a cupcake baking phase so there's probably going to be a couple of versions of Mickey cupcakes!


Thursday, July 21, 2011

Dole Whip (Magic Kingdom)

Dole Whips are amazing.  I'm sad to say I'd never tried them until my CRP program, but now I'm addicted.  It's the true sign that you're home when you're eating a Dole Whip and wandering around the Magic Kingdom.  It's one of the few places in the world where you can get this magnificent treat.  That's why I was so surprised to find that the at-home recipe was so simple!

Rob adding the sugar before blending

The Ingredients

  • 2 cans (20 oz. each) DOLE Crushed Pineapple
  • 2 tablespoons lemon juice
  • 2 tablespoons lime juice
  • 1/3 cup sugar
  • 1 1/2 cups heavy whipping cream

The Instructions

    Part I
  1. Drain crushed pineapple, reserving 2 tablespoons of the juice.
  2. Place pineapple, lemon juice, lime juice, sugar and reserved pineapple juice in blender or food processor container.
  3. Cover and blend until smooth.
  4. Pour into two 1-quart freezer zipped bags.
  5. Store bags flat in freezer. Freeze about 1-1/2 hours or until slushy.
  6. Part II When everything is slushy...
  7. Pour whipping cream into large bowl and whip
  8. Stir pineapple slush into whipped cream until just blended
  9. Return mixture to freezer until completely frozen (about 1 hour)
  10. Enjoy the deliciousness!

The Review

Well, to start off let's look at the comparison:  Jenn's Dole Whip, and Disney's!


Clearly, there is one big difference... mine isn't quite soft-serve.  This  is just because I left it in the freezer for a longer time.  If you take it out of the freezer and let it sit, it will become soft again.  That being said, I never really waited for it to become soft serve because it's so good!  This is definitely going to be re-created for the next Disney Games Night!


Edited August 6th: I've made this recipe again, and when you don't over-freeze it, the recipe is perfect!  We served it at the Disney Games Night complete with Dole Pinapple Juice and it was just like we were at the Magic Kingdom!

Wednesday, July 20, 2011

Prime Time Pot Roast (50’s Prime Time Café)

Whenever we're looking for somewhere to eat at Hollywood Studios I always suggest the 50’s Prime Time Café.  I love the food and the atmosphere!  And whever I have to decide what to order, I always order the same thing: Prime Time Pot Roast.  So for our Disney Staycation, there's no guessing why I chose to re-create this fantastic Disney dish.

Rob with his Prime Time Pot Roast

The Ingredients

  • 5 lbs Top or bottom round roast
  • 1½ c Dry red wine
  • 1 Onion, diced cut into thin strips
  • 2 Carrots, peeled and diced cut into thin strips
  • 1 stalk celery, diced cut into thin strips
  • 2 cloves garlic, minced
  • 6 c Beef Bouillon
  • ¼ c Olive oil
  • Salt and pepper to taste

The Instructions

  1. Preheat oven to 350 degrees.
  2. Heat the oil in a large pan over medium-high heat.
  3. Season the meat with salt and pepper, brown the meat on all sides.
  4. Remove the meat to a roasting pan, and pour the wine around the meat.
  5. Sauté the cut vegetables until golden brown and add to the roasting pan.
  6. Pour the beef bouillon over the roast.
  7. Add the garlic to the pan and cover.
  8. Cook 30-45 minutes per pound. Remove from oven and let rest for 15 minutes. 
Serve alongside your favourite starch (or if you want it exactly like the 50's Prime Time Cafe, serve it over skins-on mashed potatoes). 

The Review

Amazing!  Just look at the two side by side!

  
There are a couple of small differences:
  1. The carrots and celery from Disney are a little "fresher".  To remedy this consider waiting to add your veggies until the last 60-90 minutes.
  2. The Disney gravy is a little thicker.  I made my gravy by dissolving a couple of tablespoons of cornstarch in water, adding it to the juices in a saucepot, and letting it all boil down to thicken up.  I was kind of hungry and wanted to eat quickly, so I guess I just didn't let it boil down enough.
  3. The Disney pot roast is a little more tender.  I cooked mine for 30 minutes per pound and then stuck a meat thermometer in to see if it was "done".  I freaked a little inside when the temperature was way past well done.  Silly newbie mistake. If you have the right cut of meat, pot roasts get more tender as they cook.  Some recipes suggest leaving the pot roast to cook for an hour at a temperature of 180F.  So don't worry about the temperature, and go by fork-tenderness (or tummy rumblings).
Overall, this was a fantastic entree!  My Dad loved it so much he asked for the recipe!


Tuesday, July 19, 2011

Pineapple Coconut Bread ('Ohana)

I love all of the food at 'Ohana, but one of my favourite things is the bread! When I saw this recipe I was a little cautious because I've never made bread before, but Rob encouraged me to try!

The Ingredients

    Pineapple/Coconut Mixture
  • 1 C. Crushed pineapple
  • 1 C. Unsweetened coconut
  • 1 C. Sugar
  • 2 T. Cornstarch
    Dough
  • 1 3/4 C. Water
  • 1 Egg Yolk
  • 2 T. Shortening
  • 4 1/2 C. High Gluten Flour (I substituted Bread Flour)
  • 1/2 tsp. Salt
  • 1/3 C Sugar
  • 1 T. Instant Yeast

The Instructions

    Pinapple/Coconut Mixture
  1. Combine pineapple and coconut in bowl.
  2. Combine sugar and cornstarch in separate bowl and mix well.
  3. Add sugar and cornstarch mixture into pineapple and coconut mixture and mix well (with beaters?).
  4. Refrigerate for 1 hour.
    Dough
  1. Combine all ingredients in order of recipe in mixing bowl, and mix with dough hook until dough picks up on hook and the sides of the mixing bowl is clean. (Rob and I did this by hand... no bulky stand mixers for us!)
  2. Let dough rise until it doubles in size.
  3. Roll out dough onto a floured surface until it is 2 inches thick.
  4. Next spread pineapple/coconut mixture over the top of the dough.
  5. Fold dough into itself and place in a greased 9" x 13" cake pan.
  6. Cut dough into pieces with a pizza cutter and spread out cut pieces evenly in cake pan.
  7. Let dough rise in warm oven (110 degrees F) - about half way up the pan.
  8. Bake at 325 degrees F for 20-25 minutes or until golden brown.
  9. Let bread cool, cut and serve.

The Review

The picture above looks really delicious (well, it tasted really delicious)... until you compare it to what the real 'Ohana bread looks like...

 
Photo of 'Ohana Bread from the Disney Food Blog

Where did I go wrong?  I mostly followed the instructions (I didn't follow the part with the stand mixer because I didn't have a stand mixer.  I did it the old fashioned way... by hand).

I'm going to start out blaming the flour.  I did substitute bread flour instead of high-gluten flour but from what I understand (from Google) that's not a big problem.  What likely was a problem was the age of the flour.  Let's just say I found it at my Dad's house, and I don't think he ever bakes (I know, flameful).

But even excluding the flour problem, the pineapple and coconut to bread ratio was still much higher in my bread when compared to the real stuff.  There were chunks of pineapple in my bread.  I'm starting to think that by "mix well" they meant with beaters or something that would smooth out the mixture... rather than this.


I'm also wondering if we didn't let our bread rise enough... we were kind of in a rush because we needed the oven for the pot roast.  Next time I'm going to be a little bit more careful about how I judge whether it has "doubled in size".

Despite my complaining, it really was delicious.  We were a loaf down before dinner even started, and we kept commenting that it would make great breakfast muffins.  I had some for breakfast the other day and I have to agree, it was a really good breakfast treat.

I'm going to have to try this again with better measuring tools (did I mention my Dad only had a 1/2 teaspoon, and a 2-cup and 4-cup Pyrex?), newer flour, and better mixed pineapple... I'll let you know how it turns out!  Until then, if you have any bread making tips, be sure to share them!


Monday, July 18, 2011

Honey Lime Dressing ('Ohana)

For my first recipe review I'll start with something simple, Honey Lime Dressing from Ohana's!

The Ingredients

  • 1/2 cup honey
  • 1 tsp dry mustard
  • 1 tsp salt
  • 1/2 cup cider vinegar
  • 1/4 cup lime juice
  • 1/4 cup diced white onion
  • 1 cup canola oil

The Instructions

  1. Add everything but the canola oil to a blender or food processor and mix until smooth.
  2. Slowly drizzle canola oil until well blended

The Review

This was delicious! I wouldn't worry about exact amounts for the ingredients and would just add/subtract to taste. I ended up adding extra honey, because I like things sweet.

Also, I'm not very kitchen savvy, so I wasn't exactly sure what they meant by "slowly drizzle..." I just added some and mixed. In the end if you refrigerate it for awhile it will separate like any dressing. Just make sure to mix or shake it before serving.

This makes a lot of dressing, so if you're only feeding a few people I would consider halving or even quartering it!

Enjoy!


Sunday, July 17, 2011

Disney Staycation

It's been a very busy couple of months!  This April Rob and I had our wedding and honeymoon (Hawaii, not Disney), and in June I had my MBA Convocation.  In between I've been applying for jobs and just thinking about our future.

With all of this uncertainty in our future we can't even begin to think about when we'll get to make our next trip to Disney.  So we were starting to get a little antsy and missed Disney even more.  That's when I came up with a great idea... a Disney staycation.

When we go to Disney we always have our video camera on hand to film the shows, fireworks, and other special memories, so we thought we'd spend an evening watching some of our home movies.  To add to the Disney Magic I thought I'd try to recreate some of our favourite Disney foods from the Disney Recipe Exchange.

Here's how it turned out! The menu consisted of:

Pineapple Coconut Bread (Ohana's)

Salad with Honey-Lime Dressing (Ohana's) and
Pot Roast (50's Prime Time Cafe)
 
(Extra Frozen) Dole Whip (from the Magic Kingdom)
 While eating these delicious treats we enjoyed watching Beauty and the Beast, Fantasmic, Wishes, the new Castle Lights Display (which I've never seen in person, but my Dad recorded when he was there in January), Illuminations,  and the Move-It, Shake-It, Celebrate-It Parade (from the trip where Rob proposed).

I must admit, it did the trick!  It really felt like a mini-vacation to Disney (with more shows and fireworks than you could ever cram into one day).  Our Disney Staycation also inspired me to repurpose this blog.  Rather than just detailling our trips to Disney Rob and I will now be blogging about how we keep the Disney Magic in our everyday lives through unique ideas and recipes!

What do you think?  How do you add Pixie Dust to your daily routine?  Stay tuned for more updates, including detailed reviews and recipes from our Staycation!